


ApexSQL Data Diff is a tool for comparison and synchronization of SQL Server database data and it can compare live databases and backups. In this article, key and unique features, which create advantages of ApexSQL Data Diff vs. Visual Studio®, will be shown and explained.
The following described features are the features which are available in different versions of ApexSQL Data Diff and which don’t exist in Visual Studio®.
Projects
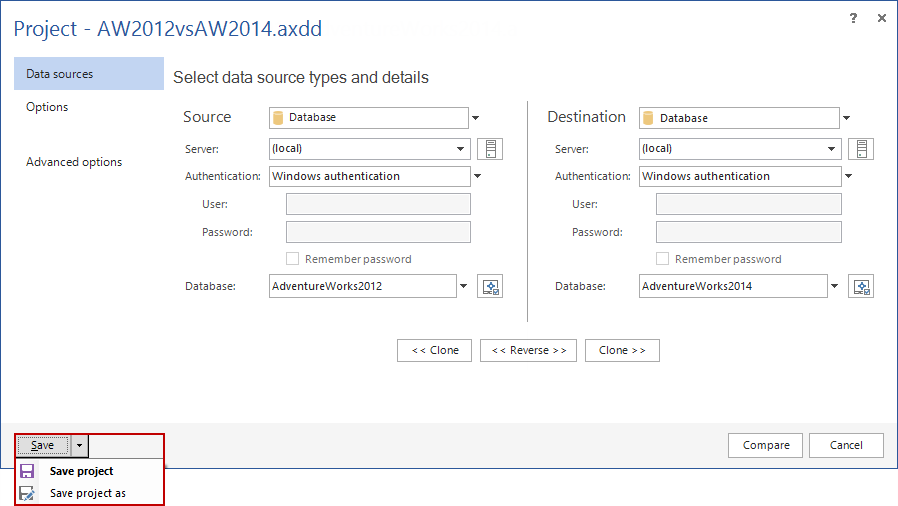
ApexSQL Data Diff has an option to save the current project on which you’re working and it can be loaded later on. For example, if certain options are set up, filter out objects/rows, and the same ones will be used several times when the application is started, the project can be saved and used it whenever it’s needed. All saved projects will be shown in the Project management window, upon the application is started:

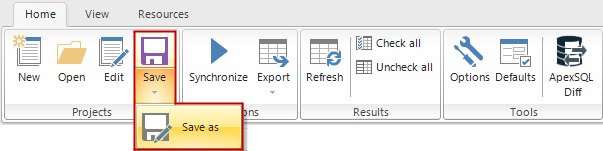
Projects can be saved from the bottom left corner of the New project window or once the comparison is done, from the Home tab of the main application window:
Also, you can use the same project and run it from the CLI and therefore use only one switch, instead of setting up each option individually. Check out how to use the project file in the CLI from an article at this link.
Additionally, you can even schedule the synchronization process using the project file and you can learn more about it from here.
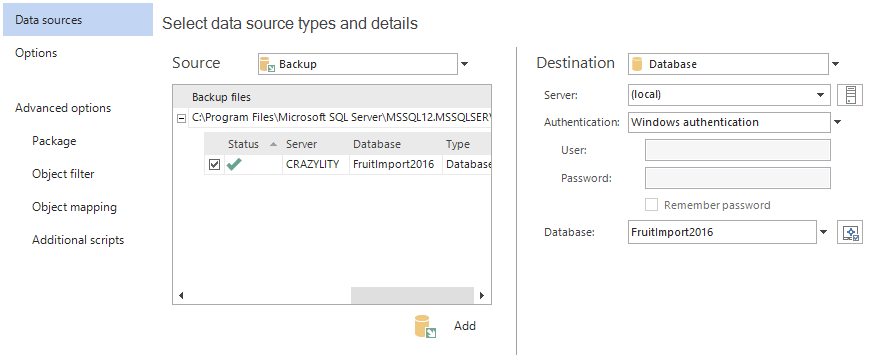
Backup comparison
This type of comparison is particularly helpful, when there is a need to recover specific data/ rows and synchronize from backup to live database. You can learn more about it from here.
One of the interesting use cases is also to restore SQL Server backup to a newer version of SQL Server and you can find out more about here.
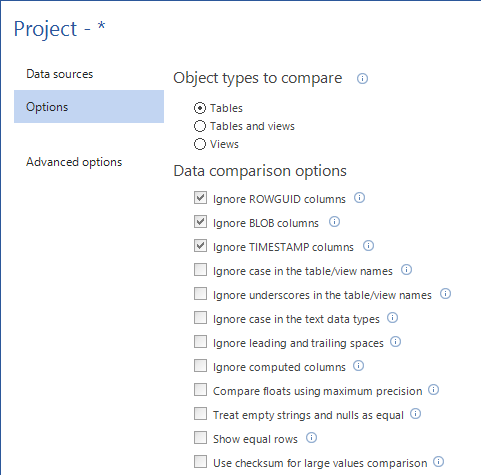
Comparison and synchronization options
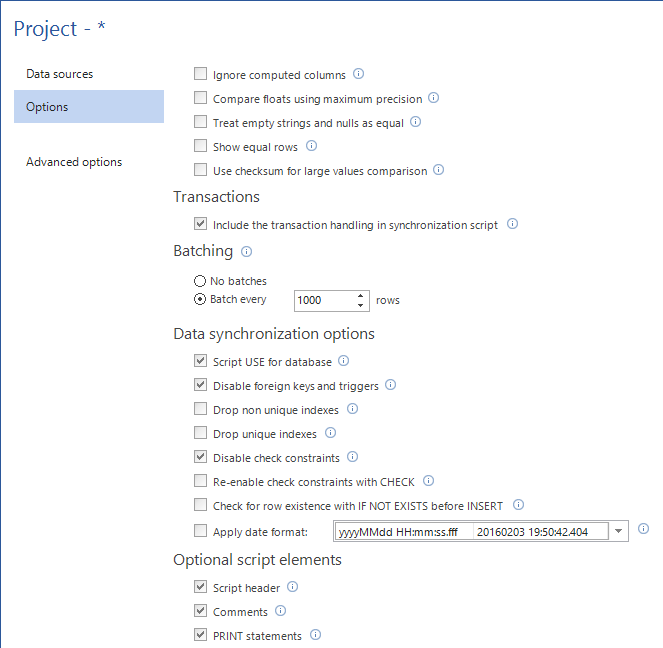
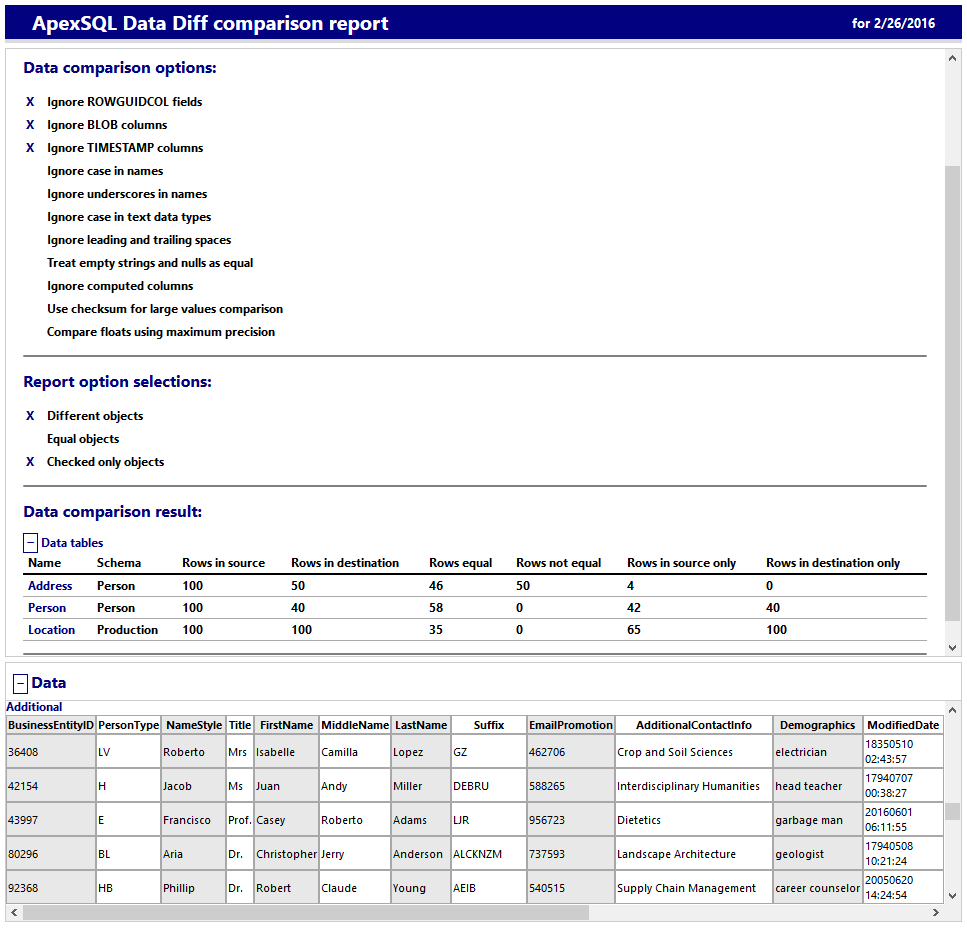
In the Options tab, there are a couple of comparison options that can be checked to ignore specific things in the objects which are not important and speed up the comparison process:
- ROWGUID columns – differences in ROWGUID fields will be ignored
- BLOB columns – All BLOB and CLOB columns, including image, text, ntext, varbinary (max), varchar (max), nvarchar (max), and XML will be ignored
- TIMESTAMP columns – differences between TIMESTAMP columns will be ignored
- Case in the table/view names – case difference in table and view names will not be considered during the mapping and comparison
- Underscores in the table/view names – differences in underscores in table and view names will not be considered during the mapping and comparison
- Case in the text data types – case in text data types (text, ntext, varchar, nvarchar, etc.) will be ignored
- Leading and trailing spaces – spaces before and after the text in text columns will be ignored
- Computed columns – data fields in computed columns will be ignored
Additionally, there are a couple of more options that can be helpful during the comparison process:
- Compare floats using maximum precision – float data type columns will be compared using the maximum available precision. If this option is not checked, 14 digits are compared by default
- Treat empty strings and nulls as equal – if this option is checked, then empty strings and nulls will be considered as equal during the comparison
- Show equal rows – data for equal rows will be stored on the local PC and they will be shown in the Equal tab, in the Results grid. This option might require much HDD free space, if large database are compared
-
Use checksum for large values comparison – calculates checksum for large values (varchar, image, text, blob columns) on the source side and compare with the checksum of the same values calculated on destination side, without real value data transferring
As for the synchronization options, the following are available:
- Include the transaction handling in synchronization script – if any error occurs during the synchronization, this option will rollback any changes made on the destination side
- Script USE for database – adds USE <database> statement in the synchronization script
- Disable foreign keys and triggers – to avoid any referential integrity errors, foreign keys and triggers are disabled at the table level and automatically re-enabled after the rows have been synchronized
- Drop unique/non unique indexes – unique/non unique indexes will be dropped before and recreated after table synchronization. This option could improve performance of synchronization process due to less index rebuild operations
- Disable check constraints – avoids errors due to the failed check constraints
- Re-enable check constraints with CHECK – after data is synchronized, all previously disabled check constraints are re-enabled using the WITH CHECK option
-
Check for row existence with IF NOT EXIST before INSERT– avoid error if the row with same comparison key already exists
Row filter
The Row filter option can be used to speed up the comparison and synchronization process by defining a specific condition that will include only specific rows.
To set up a condition and narrow down to specific rows, expand the Advanced options and select the Object filter tab. Here, the list of all tables will be shown. Select the desired table and click the “ellipse” button in the Row filter column:
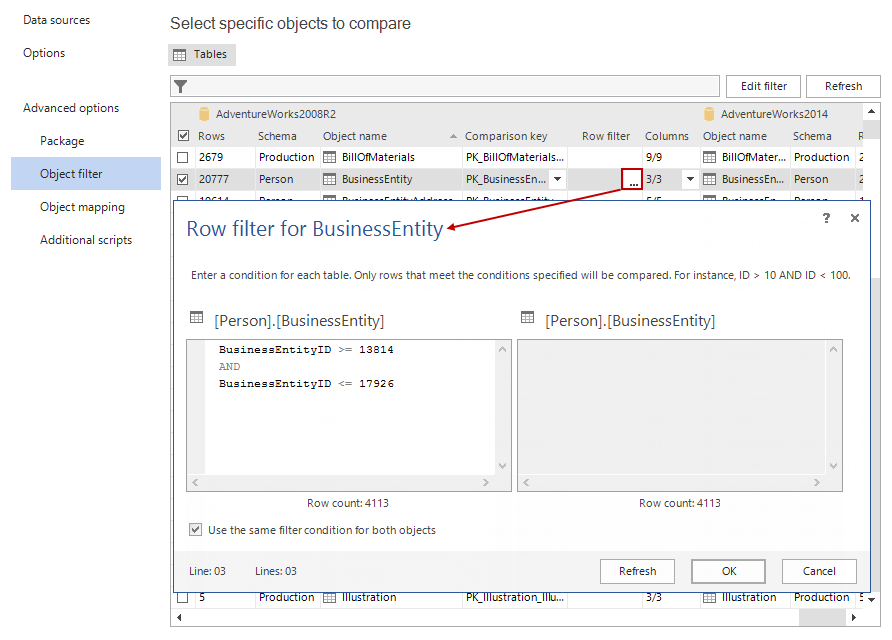
The Row filter window for selected table will be shown and a condition can be set. In this particular example, the condition: BusinessEntityID >= 13814 AND BusinessEntityID <= 17926 is set for the BusinessEntity table which has 20777 rows in total. This condition filtered out 4113 rows, which number can be seen by clicking the Refresh button.
Since the Use the same filter condition for both objects option is checked the same condition will be applied to both, source and destination tables.
More about using the Row filter option can be found in article on this link.
In addition to the Row filter option, you can see all Object filtering options and how to narrow a data comparison to affected rows only, which is explained here.
Custom comparison key
In order to properly compare tables/views, each table/view need to have a PRIMARY KEY constraint or a UNIQUE constraint (or index), so that each single row is uniquely identified in the source and destination data source. By default, ApexSQL Data Diff automatically detects and maps tables/views that have a PRIMARY KEY constraint or a UNIQUE constraint/index.
However, in some tables/views there is no PRIMARY KEY or a UNIQUE constraint/index and in that case ApexSQL Data Diff offers an option to create a Custom comparison key, which can be used during the comparison process.
To create a Custom comparison key, select your source and destination data source, expand the Advanced options, and click the Object filter tab. In its window, the list of all paired tables/views is shown. Select a table/view for which you want to create a Custom comparison key, in the Comparison key column, click the Arrow button, and then select the Edit custom key option:
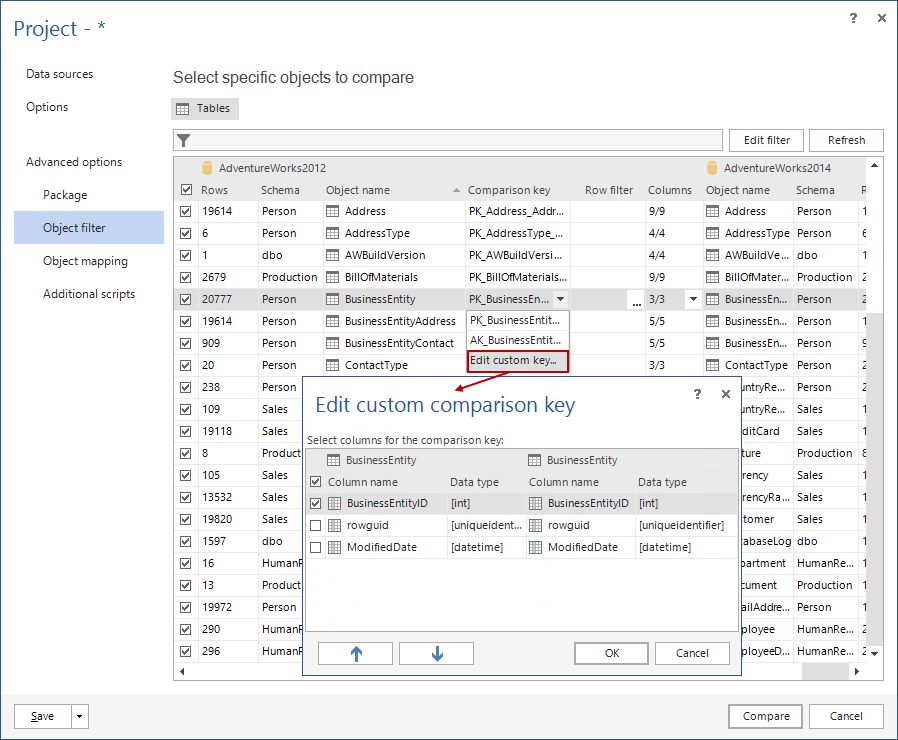
The Edit custom comparison key window will open with a list of all paired columns for the chosen table, and any of them (or several) can be selected as a Custom comparison key. Once the Custom comparison key is chosen, click the OK button and it will be defined.
You can learn more about Custom comparison keys from here.
Object mapping
ApexSQL Data Diff automatically maps all tables/views with the same names and schemas, by default. But, when there is a specific scenario when a source and destination database have the same table/view (their structure is the same), but they differ in name or schema, the Object mapping feature can come in handy.
To perform custom mapping, click the Object mapping tab, under the Advanced options. The automatically mapped tables/views, with their columns, will be shown here, along with the ones that are not mapped below:
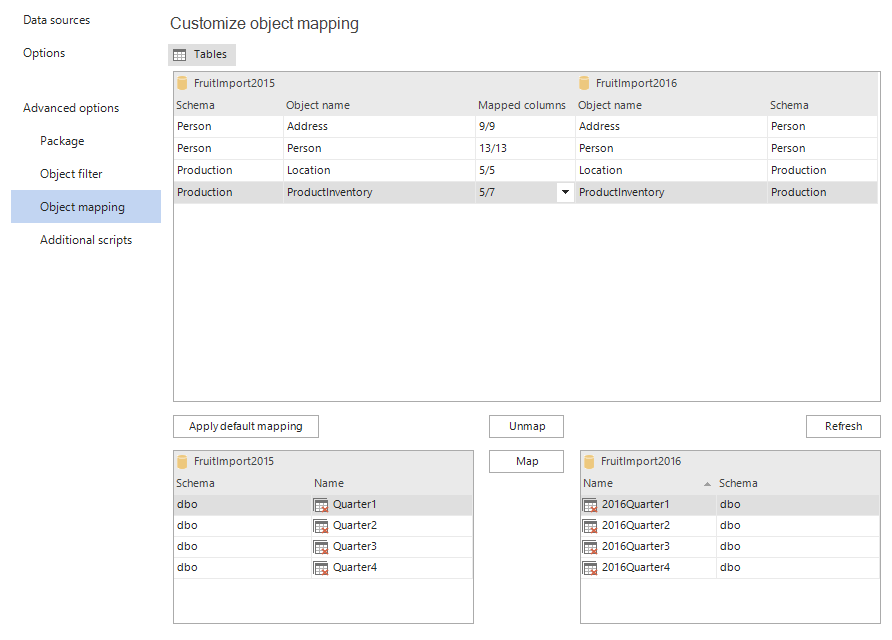
In the above example, table names have changed in the destination database, but they have the same structure. To map these tables, select a table on the left (source) side (Quarter1) and the appropriate one on the right (destination) side (2016Quarter1) and click the Map button:

After the mapping is completed, the mapped tables will be shown in the above list:
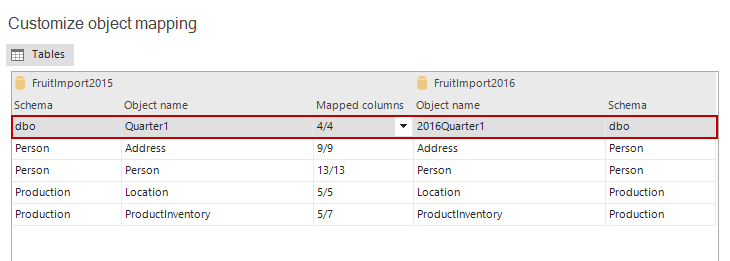
Additionally, the Column mapping can be performed as well. For instance, compared tables are already mapped, but some columns have different names. In the above screenshot, the ProductInventory table has 5/7 columns mapped, so it means that 2 columns are currently unmapped and won’t be compared.
To map columns, select a desired table and click the Arrow button in the Mapped columns column:
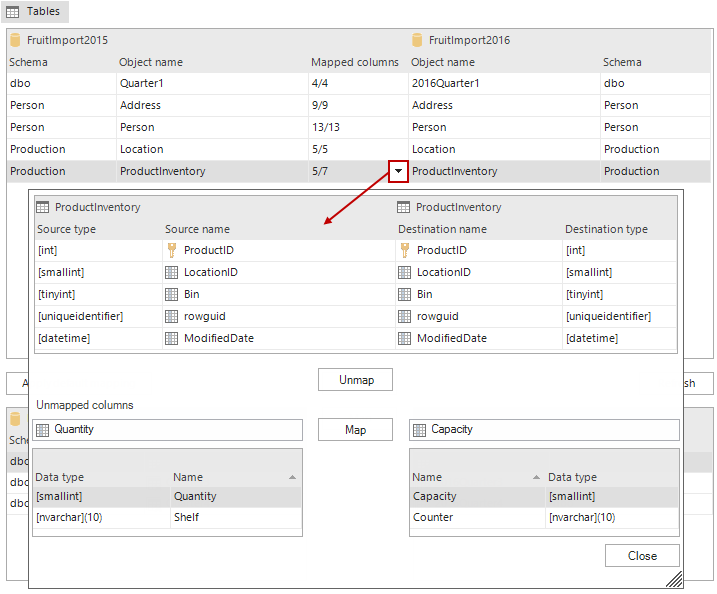
The Mapped columns window will be shown, containing the list of all mapped columns and below it there are columns which are currently unmapped. Since there were some changes in the destination database, where a couple of columns are differently named (Quantity -> Capacity and Shelf -> Counter)
The mapping of these columns is basically the same as mapping tables. Select a column on a source side (Quantity) and select the appropriate one on the destination side (Capacity), click the Map button and do this for the other one as well:
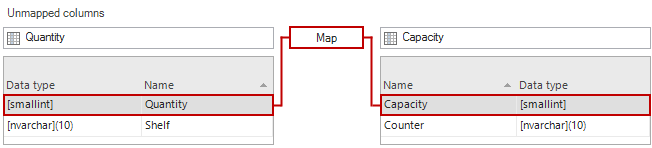
Once all columns are mapped and shown in the list above, click the Close button in the bottom right corner, and in the Object mapping list, the ProductInventory table will have 7/7 mapped columns:

More about performing custom object mapping and some use cases can be found on this link.
Additional scripts
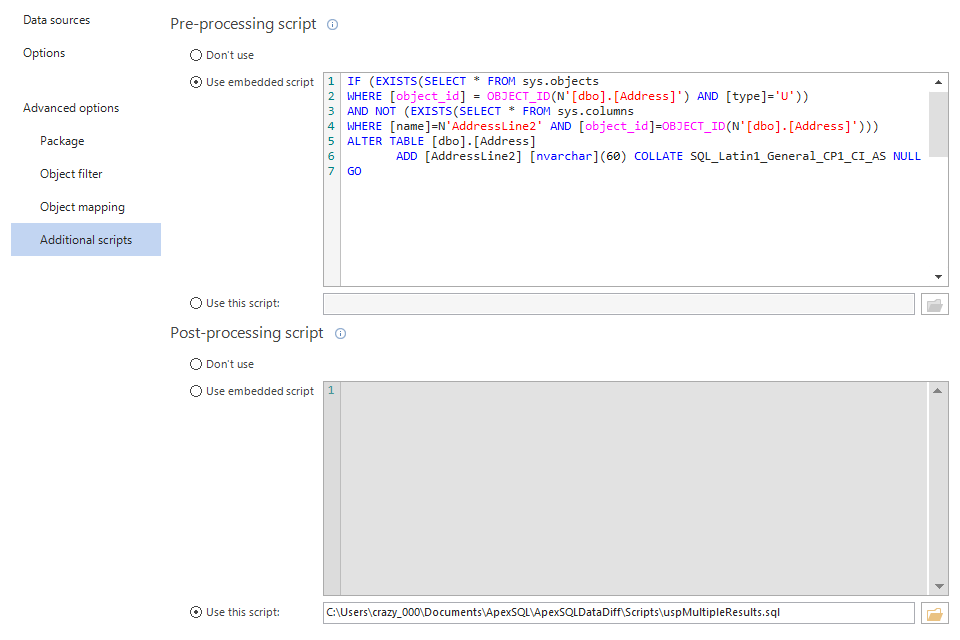
When the Advanced options are expanded, in the New project window, the Additional scripts options can be used. In specific cases, pre-processing and/or post-processing scripts can be created directly by using the Embedded script option and/or to load already created script.
In the following example, for the Pre-processing script, the Embedded script will be used to create a script that will modify the structure before the data synchronization. Since there are some minor differences in structure of source and destination table, the Pre-processing script can be used to modify the structure of destination table and therefore avoid using any additional tools.
Table in source database:
Address
AddressId,
AddressLine1
AddressLine2
City
Table in destination database:
Address
AddressId,
AddressLine1
City
By adding the following script, the Pre-processing script will check the destination database and update the table structure with the missing column (AddressLine2):
IF (
		EXISTS (
			SELECT *
			FROM sys.objects
			WHERE [object_id] = OBJECT_ID(N'[dbo].[Address]')
				AND [type] = 'U'
			)
		)
	AND NOT (
		EXISTS (
			SELECT *
			FROM sys.columns
			WHERE [name] = N'AddressLine2'
				AND [object_id] = OBJECT_ID(N'[dbo].[Address]')
			)
		)
	ALTER TABLE [dbo].[Address] ADD [AddressLine2] [nvarchar] (60) COLLATE SQL_Latin1_General_CP1_CI_AS NULL
GO
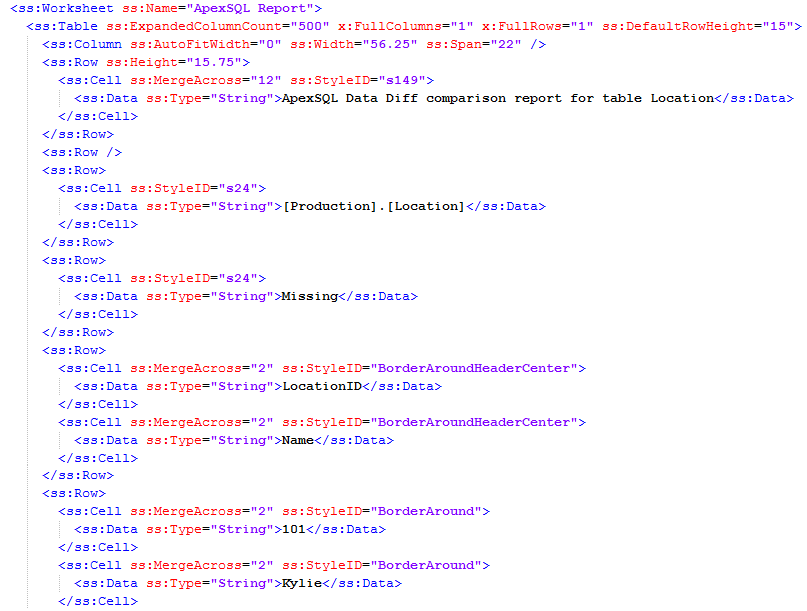
For the Post-processing script, an already created script will be loaded, which will create a new procedure in the destination database:
USE FruitImport2015;
GO

CREATE PROCEDURE dbo.uspMultipleResults
AS
SELECT TOP (10) Apple
	,Orange
	,Banana
FROM dbo.Quarter1;

SELECT TOP (10) LocationID
	,NAME
	,CostRate
FROM Production.Location;
GO
As shown on the screenshot below, the Pre-processing script is loaded with the Use this script option and the Post-processing is entered by choosing the Use embedded script option:
Packages
Database installer packages can be used in a scenario when there is no direct connection to SQL Server database that needs to be updated with new data. In this case, a database backup can be taken and send to Headquarters.
In Headquarters, ApexSQL Data Diff is run, the master database is set as the source and the backup as the destination. Once the comparison is done and objects for synchronization are selected, start the Synchronization wizard and in the Output options step choose the Executable installer action.
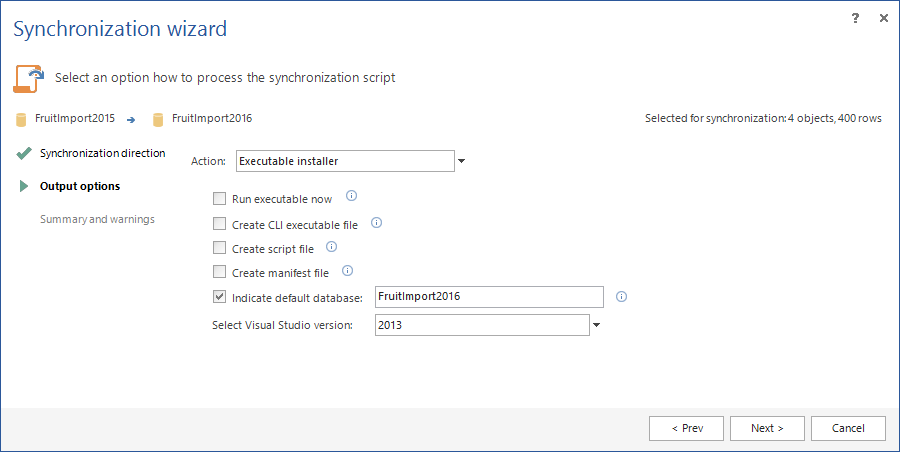
Once the Executable installer is created, it can be sent and run on any server where a destination database has the same structure as the one used in the comparison process, in order to update it.
All about ApexSQL database installer packages is explained in the article on this link.
Reports and exports
ApexSQL Data Diff offers three different versions of reports and exports:
- HTML reports
- CSV data export
- Excel report
-
As for HTML reports, there are two of them: HTML and HTML simple report. The main difference between HTML report and HTML simple report, is that HTML report has an interactive way of navigation through the report. It allows to expand/collapse the Data comparison results and data for individual objects, which allows better user experience and easier usage.
More about HTML reports can be found here.
-
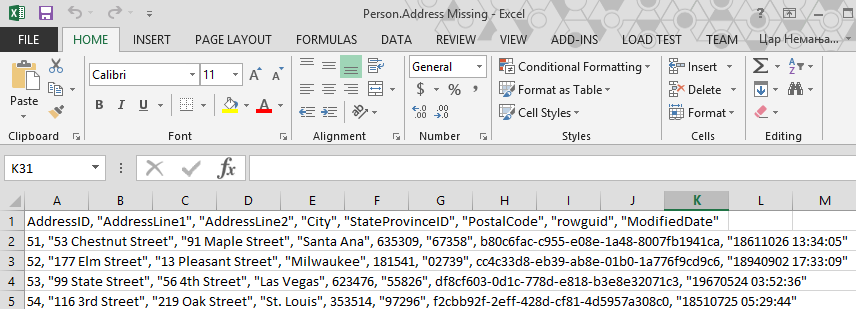
CSV data export can export different/equal rows that can be used later on as a “backup” of data before the synchronization or as a source for any other application where exported CSV data can be used.
Each table with its data is exported into individual CSV file. These files contain only table data, separated by a coma:
-
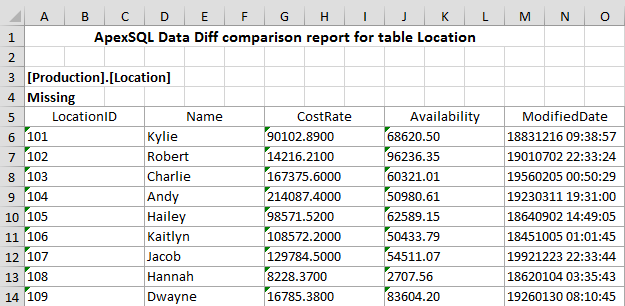
Excel report offers the same preview of comparison information as in an HTML simple report:
But, it can be also viewed as an XML report, where each tag can be manually edited and its values can be changed:
SQL Server Management Studio integration
ApexSQL Data Diff can be integrated into SQL Server Management Studio (SSMS) for easier initializing of quick and simple comparisons.
For example, some changes were made on database while working in SSMS and you want to compare databases. In Object Explorer, right-click the desired database, choose ApexSQL Data Diff, and Set as source database:

The following window will be shown, where you can choose your destination database:
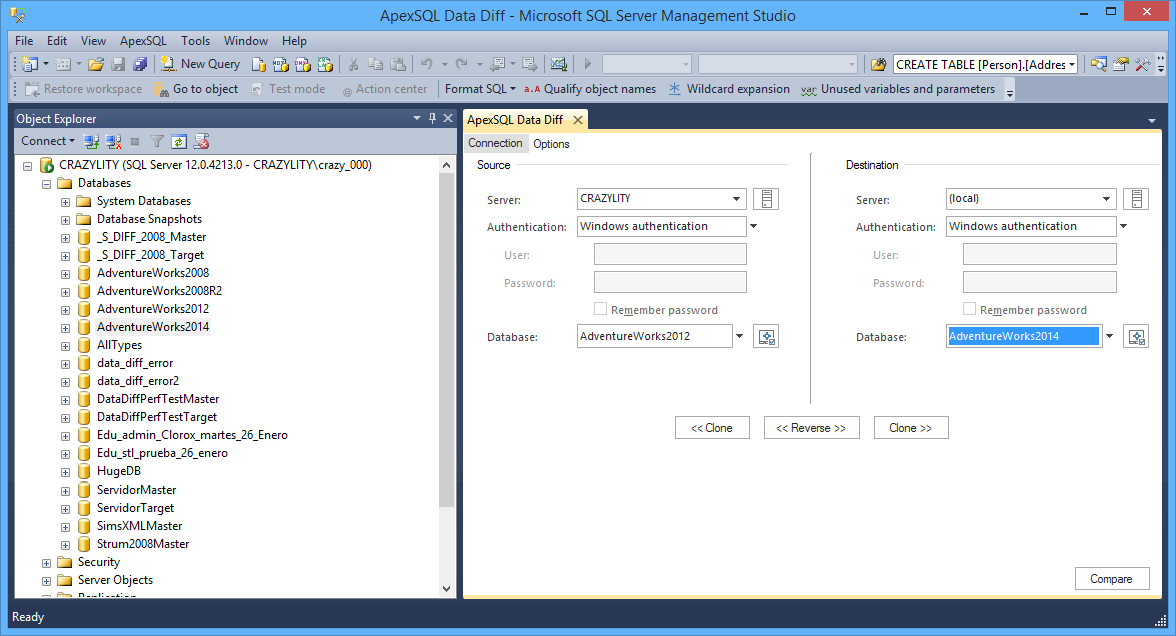
If you switch to the Options tab, you can set the same comparison and synchronization options that exist in the Options tab of the New project window.
Once everything is set, click the Compare button, in the bottom right corner, and this will initialize ApexSQL Data Diff application and the comparison process.
Three different editions
The application has Community, Standard, and Professional editions with various options included.
The Free Community edition supports SQL Server Express databases, SQL Azure databases, basic comparison and synchronization options, Custom comparison keys, Object mapping, Data compare filters, Projects, Reports, and exports.
The Standard edition fully supports comparison and synchronization of SQL Server editions (2005-2014).
The Professional edition includes all options from the Standard edition, including the CLI support, packages, augmentation of the deployment script with pre or post-synchronization scripts, and to restore selected objects/rows from database backups.
For more information on the different editions in ApexSQL Data Diff, please visit this link.
The below comparison matrix concludes an overview of all features contained in both compared applications:
|
|
|
|||
|
|
|
|
|
|
| Inputs | ||||
| Live database |
 |
|
|
|
| Database backup |
|
|||
| Script folder | |
|||
| Source control project or label | |
|||
| Outputs | ||||
| SQL script |
|
|
|
|
| Direct database synchronization |
|
|
|
|
| Packages |
|
|||
| Direct Source control | |
|||
| Reports and exports | ||||
| CSV |
|
|
|
|
| HTML |
|
|
|
|
| XML |
|
|
|
|
| Excel |
|
|
|
|
| General features | ||||
| Custom comparison keys |
|
|
|
|
| Warnings and messages |
|
|
|
|
| Object mapping |
|
|
|
|
| Data compare filters |
|
|
|
|
| Projects |
|
|
|
|
| Pre and post synchronization scripts |
|
|||
| Source control integration | |
|||
| Other | ||||
| Command line interface |
|
|
||
| SQL script editor |
|
|
|
|
| Use cases | ||||
| Direct SQL database backup comparison |
|
|||
| Recover data rows from SQL database backup |
|
|||
| Database comparison with source control repository | |
|||
ApexSQL Data Diff 2016.03.0110
Visual Studio® 14.0.24720.00 Update 1
March 3, 2016


